Wiring a light switch can seem tricky at first. But with the right diagram, it’s much easier.
Understanding how to wire a light switch is a valuable skill for any homeowner. It not only saves money but also boosts confidence in handling minor electrical tasks. A clear diagram is your best tool. It shows the connections and components involved.
This helps make the process straightforward and safe. Whether you’re replacing an old switch or installing a new one, a diagram guides you step-by-step. It reduces the risk of errors and ensures everything works smoothly. In this guide, you’ll learn how to read and follow a light switch wiring diagram. With this knowledge, tackling your next electrical project will be a breeze.
Choosing The Right Tools
Choosing the right tools for wiring a light switch is crucial. It ensures efficiency and safety. Proper tools make the task easier and more effective. Before starting, gather all the necessary tools. This prepares you for a smooth wiring process. Below are essential tools and safety gear to consider.
Essential Tools List
A few tools are essential for wiring a light switch. First, a screwdriver is necessary. It helps in loosening and tightening screws. A wire stripper is another must-have. It strips the insulation from the wires. Needle-nose pliers are helpful for bending and twisting wires. A voltage tester checks if the circuit is live. Ensure you have these tools before starting the project.
Safety Gear And Precautions
Safety is vital in any electrical project. Use insulated gloves to protect your hands. They prevent electric shock. Safety goggles guard your eyes from debris. Always switch off the power at the breaker box. This is crucial to avoid accidents. Make sure your work area is dry. Water increases the risk of electric shock. Double-check all connections before turning the power back on.
Understanding Electrical Basics
Grasping electrical basics is crucial for wiring a light switch. It ensures safety and efficiency. Understanding these concepts helps avoid common mistakes. It also empowers you to troubleshoot issues confidently. Explore the essential components and principles in wiring.
Circuit Components
A light switch circuit has several key components. The switch itself controls the flow of electricity. It acts as a gateway. Wires connect the switch to the power source and the light fixture. Typically, you’ll find three wires: hot, neutral, and ground. The hot wire carries electricity to the switch and light. The neutral wire returns electricity to the source. The ground wire prevents electrical shocks.
Current Flow Principles
Electricity flows in a loop called a circuit. The switch opens and closes this loop. In a closed position, electricity flows through the switch. It continues to the light fixture, powering the bulb. When open, the circuit breaks, stopping electricity flow. Current flows from the power source to the light and back. This cycle continues as long as the switch is closed. Understanding this flow is key to safe electrical work.
Preparing Your Workspace
Setting up a workspace for wiring a light switch diagram requires careful organization and safety. Clear the area of any clutter. Gather all necessary tools and materials before starting.
Preparing your workspace is a crucial step when wiring a light switch. Imagine diving into a project, only to realize halfway through that you’re missing essential tools or haven’t ensured your safety. It’s happened to the best of us, but with a little preparation, you can turn a potentially frustrating task into a smooth and satisfying experience. Let’s make sure you have everything you need before you get started.Power Off Protocols
Before anything else, ensure your safety by turning off the power. Locate the circuit breaker or fuse box in your home. Identify the switch corresponding to your workspace and flip it off. Test the light switch to confirm there’s no electricity. Use a voltage tester if available. This step is non-negotiable; safety always comes first. Consider placing a piece of tape over the switch as a visual reminder to others that work is in progress. This simple step can prevent accidents and interruptions.Organizing Materials
Gather all the necessary tools and materials before starting. Have your screwdriver, wire stripper, and voltage tester at hand. Don’t forget the light switch and electrical tape. Organize your tools in a way that’s easy to reach while you work. Use a small table or tray to keep everything within arm’s length. This prevents unnecessary movement and helps you stay focused. Take a moment to review the wiring diagram. Familiarize yourself with the steps ahead. Knowing your plan makes the task less daunting and boosts confidence. Every workspace is different, so adapt these suggestions to your environment. What challenges have you faced when preparing for DIY projects?
Identifying Switch Types
Understanding the different types of light switches is crucial when you’re wiring a light switch diagram. Each type of switch serves a specific function and can change how you set up your lighting system. Knowing the difference between them can save you time and prevent potential electrical mishaps. Let’s explore the types of switches you’ll encounter and how they might fit into your next project.
Single Pole Vs. Three-way
The single pole switch is the most common type of switch found in homes. It controls a light fixture from one location. If you’ve ever flipped a switch to turn on your kitchen light, you’ve likely used a single pole switch.
On the other hand, a three-way switch lets you control a light from two different locations. This is particularly useful for staircases or long hallways. Imagine being able to turn off your basement light from both the top and bottom of the stairs. It offers convenience and safety.
Have you ever wondered if you need a three-way switch in your living room? Consider how often you enter from different doors and how practical it would be to have control from multiple spots.
Specialty Switches
Specialty switches offer unique features that go beyond simple on and off functions. Dimmer switches, for example, allow you to adjust the brightness of your lights. They’re perfect for creating ambiance in dining rooms or living areas.
Another type is the motion sensor switch, which automatically turns lights on or off based on movement. This can be a smart choice for rooms like bathrooms or garages. It saves energy and adds an element of convenience.
Have you considered using a timer switch for your outdoor lights? They can ensure your lights turn on at dusk and off at dawn, enhancing security while you’re away.
When choosing a switch, think about your lifestyle needs. Specialty switches can add significant value by enhancing both functionality and aesthetics in your home.
Wiring A Single Pole Switch
Easily understand wiring a light switch diagram with simple steps. Connect wires to terminals, ensuring proper alignment. Follow safety precautions to avoid electrical hazards.
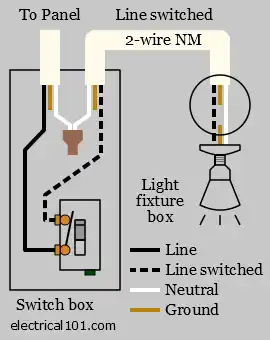
Wiring a single pole switch is a task many homeowners undertake to enhance their DIY skills. Imagine the thrill of successfully wiring a switch and seeing the light come on! It’s a straightforward process, but requires attention to detail. Whether you’re replacing an old switch or installing a new one, understanding the wiring diagram is crucial. Let’s dive into the key aspects of wiring a single pole switch.Connecting The Ground Wire
The ground wire is your safety net, ensuring that any electrical faults are directed away from you. Start by locating the green or bare copper wire in your switch box. This wire should be connected to the green screw on the switch. Ensure the connection is tight. Use a screwdriver to secure it firmly. This simple step could protect you from potential electrical hazards. Did you know that a loose ground wire can affect the switch’s performance? Always double-check this connection for peace of mind.Attaching Hot And Neutral Wires
The hot wire, usually black, carries electricity to your switch. Identify this wire and connect it to one of the brass screws on the switch. Make sure it’s attached securely to prevent any loose connections. Next, find the neutral wire, typically white. This wire completes the circuit. Connect it to the silver screw or attach it to the neutral bus bar in the electrical box. Have you ever wondered why the hot and neutral wires must be connected correctly? An incorrect wiring could lead to electrical shorts or even a fire hazard. Always verify your connections before turning the power back on. As you tackle this project, remember that precision is key. Each connection you make is a step towards a brighter, safer home. Are you ready to flip the switch and illuminate your space?Installing A Three-way Switch
Understanding a wiring diagram is crucial for installing a three-way switch. This guide helps connect switches to control a light from two locations. Follow clear instructions to ensure safe and efficient wiring.
Installing a three-way switch might seem daunting, but with the right guidance, it’s a manageable task for most DIY enthusiasts. This type of switch allows you to control a single light from two different locations. Imagine the convenience of switching your hallway light on from either end! My first attempt at installing one brought a sense of accomplishment and a new appreciation for electrical work. Let’s dive into the essential steps and terms you need to know.Understanding Traveler Wires
Traveler wires are key components in a three-way switch setup. They connect the two switches, allowing them to communicate and control the light together. Typically, these wires are color-coded, often in red or black, making them easy to identify. When I first encountered traveler wires, I was unsure of their purpose. However, understanding their role transformed my approach. They are the bridge between your switches, ensuring seamless operation. Make sure your traveler wires are securely connected to avoid any flickering issues.Completing The Circuit
Completing the circuit is the final step in your three-way switch installation. This process involves connecting all wires correctly, including the traveler wires, common wire, and ground wire. Each plays a crucial role in ensuring the switch operates smoothly. I remember double-checking my connections, wary of making a mistake. It’s crucial to ensure that all connections are tight and secure. A loose wire can disrupt the circuit and cause malfunction. Ask yourself: are all connections firm and in the right place? Consider using a voltage tester to verify that everything is working as expected. It’s a small step that can prevent bigger issues later. With the circuit complete, you’ll enjoy the flexibility and convenience that a three-way switch brings to your home lighting setup.Testing The Installation
Confirm the light switch works by flipping it on and off after wiring. Ensure lights respond correctly. Check connections for safety and proper installation.
Testing the installation of a light switch is crucial. It ensures safety and functionality. After wiring, proper testing confirms the switch works correctly. Use simple tools to check your work. This section guides you through testing steps, ensuring your light switch operates safely and efficiently.Using A Voltage Tester
A voltage tester is essential. It checks if the circuit is live. First, ensure the power is off. Switch off the circuit breaker. Then, touch the tester to the wires. If there’s no light or sound, the circuit is dead. This confirms it’s safe to proceed. Always test before any electrical work.Troubleshooting Common Issues
Sometimes, the light switch doesn’t work. Check the wiring connections first. Loose wires can cause problems. Tighten any loose screws. Ensure wires are connected correctly. Look for damaged wires. Replace them if necessary. Another issue could be the switch itself. Swap it with a new one to test. Always ensure the circuit breaker is on. If problems persist, consult a professional. Safety is the priority in electrical work.
Safety And Maintenance Tips
Ensuring safety and proper maintenance is crucial when wiring a light switch. Regular checks and safe handling prevent hazards and ensure longevity. Below are some essential tips.
Regular Inspection Practices
Inspect light switches monthly. Check for any signs of wear. Loose connections can cause problems. Tighten screws if necessary. Look for discoloration or burning smells. These indicate overheating. Replace damaged switches immediately. Use only quality materials for repairs. This ensures safety and reliability.
Handling Faults Safely
Turn off the power before inspecting switches. Use a voltage tester to confirm. Always wear rubber gloves. They provide an extra safety layer. If unsure about repairs, hire a professional. They ensure safe and correct handling. Avoid overloading circuits. This prevents overheating and potential fires. Follow manufacturer’s instructions for installation and maintenance.
Frequently Asked Questions
What Wires Go Where On A Light Switch?
Connect the black (hot) wire to the brass terminal. Attach the white (neutral) wire to the silver terminal. Connect the green or bare (ground) wire to the green screw. Ensure all connections are secure. Always turn off power before wiring to ensure safety.
Does The Hot Wire Go On Top Or Bottom Of A Light Switch?
The hot wire typically connects to the bottom terminal of a light switch. Ensure wiring matches your switch configuration. Always prioritize safety and consult an electrician if unsure. Proper installation prevents electrical hazards, ensuring reliable operation. Double-check connections for secure attachment to avoid malfunctions.
What Color Wires Go Together For A Light Fixture?
Connect black wires together for power. White wires join for neutral connections. Green or bare wires are for grounding. Always ensure connections follow local electrical codes for safety. Consult an electrician for complex installations to avoid hazards and ensure proper functionality.
Does It Matter Which Black Wire Goes Where On A Light Switch?
Yes, it matters which black wire connects to a light switch. Typically, one black wire is the hot wire, while the other connects to the fixture. Incorrect wiring may cause malfunction or safety hazards. Always ensure proper connection for optimal performance and safety.
Consult a professional if unsure.
Conclusion
Wiring a light switch is easier than it seems. Follow the diagram closely. Safety first. Always turn off the power. Gather your tools before you start. Use the right wires for the job. Connect them carefully. Check connections twice. Test the switch after installation.
Ensure everything works perfectly. A small effort brings great convenience. Lights on with a flick. Save time with the diagram. Happy wiring!


