Wiring a light switch can seem tricky. But, it’s simpler than you think.
With the right steps, you can do it safely and easily. Understanding how to wire a light switch is a valuable skill. It not only saves money but also gives you a sense of achievement. Many homeowners fear electrical tasks.
Yet, with some guidance, you can tackle them confidently. This guide will walk you through the process. You’ll learn the basics of electrical circuits and safety tips. Before you know it, you’ll be swapping out old switches for new ones. Ready to light up your space with confidence? Let’s get started on this illuminating journey!
Tools And Materials
Wiring a light switch seems challenging at first. But with the right tools and materials, it’s a straightforward task. You need to understand what essential tools and materials are required. This will ensure a smooth and safe installation process.
Essential Tools
Having the right tools is crucial. A screwdriver is a must. It helps in tightening screws and securing wires. A wire stripper is also necessary. It removes insulation from electrical wires. A voltage tester checks if the power is off. Safety gloves protect your hands from electric shocks. Keep a flashlight handy. It helps in low-light conditions.
Necessary Materials
Make sure to gather all necessary materials. You need a new light switch. Choose a switch that fits your needs. Electrical wires are important too. Ensure they are of the right gauge. Wire nuts help in connecting wires securely. Electrical tape adds an extra layer of safety. A switch plate covers and protects the switch. Always use quality materials for lasting results.

Safety Precautions
Before wiring a light switch, turn off the power at the breaker. Use insulated tools to avoid electric shock. Double-check connections to ensure safety and prevent short circuits.
Wiring a light switch might seem simple, but ensuring your safety is crucial. Neglecting safety precautions can lead to serious accidents or damage. By taking the right steps, you can protect yourself and make the process seamless. ###Turn Off Power
Always start by turning off the power. Head to your circuit breaker and switch off the circuit connected to the light switch. It’s wise to label the breaker for future reference. Test the switch with a voltage tester to double-check that no electricity is flowing. It’s better to be overly cautious than to risk an electric shock. Once you’re certain there’s no power, you can proceed confidently. ###Use Insulated Tools
When handling electrical wires, insulated tools are your best friend. They protect you from electric shocks if you accidentally touch a live wire. Opt for tools with rubber grips, as they provide an extra layer of insulation. I once used non-insulated pliers, and a slip almost cost me a nasty jolt. Learn from my mistake—invest in quality tools. Are you prepared with the right tools? If not, it’s time to upgrade your toolbox. Safety isn’t just about avoiding accidents; it’s about being ready for them.Understanding Electrical Wiring
Understanding electrical wiring is vital when working with light switches. Knowing the basics ensures safety and efficiency. It helps prevent problems and makes the task easier. This section will guide you through essential concepts. You will learn about different wire types used in homes.
Basic Concepts
Electrical wiring carries electricity throughout a building. It connects power sources to devices and outlets. Wires are enclosed in insulating materials for safety. They ensure current flows correctly without causing harm. Circuit breakers prevent wires from overheating. They shut off the flow when problems arise. Understanding circuits and connections is key. It helps with troubleshooting and installation.
Common Wire Types
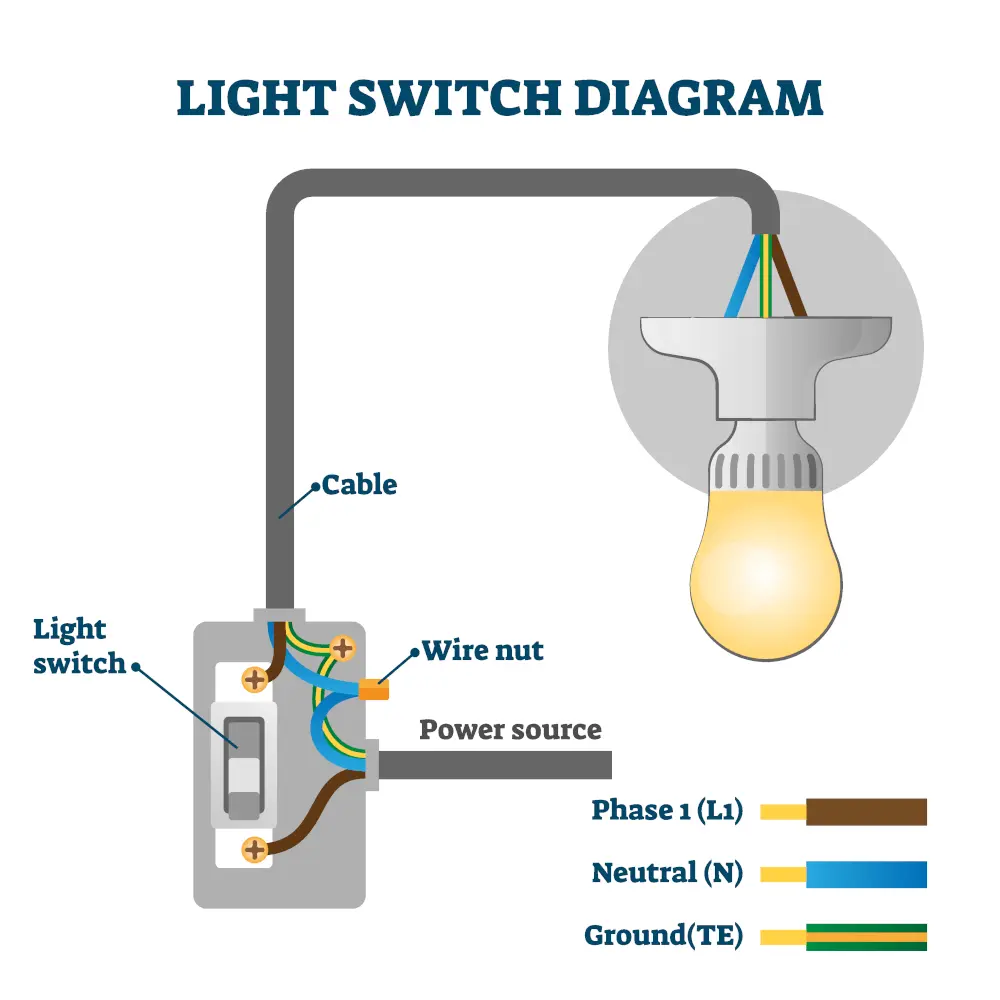
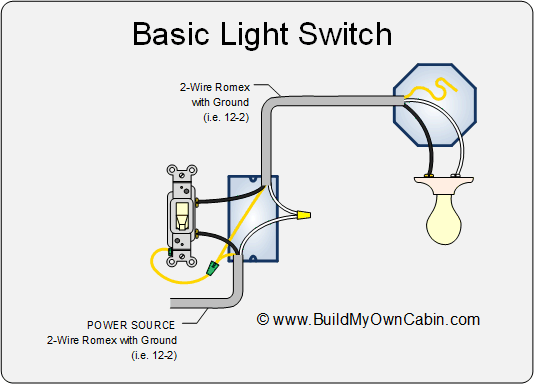
Different wires serve different purposes. There are several types used in home wiring. Copper wire is popular for its conductivity. It is flexible and durable, making it a common choice. Aluminum wire is another option. It is lightweight and affordable, but needs careful handling. Insulated wires protect against electrical shocks. They come in various colors to indicate their function. Black wires are hot wires, carrying current. White wires are neutral, completing the circuit. Green or bare wires are ground wires. They direct electricity safely into the earth.
Removing The Old Switch
Replacing a light switch starts with removing the old one. It’s a crucial step. You need to do it right for safety. Begin by turning off the power. Safety first. Always. Then, follow these steps to remove the old switch.
Detach Faceplate
Use a screwdriver to unscrew the faceplate. This reveals the switch beneath. Keep the screws safe. You’ll need them later. Gently pull off the faceplate. Check for any hidden screws. Remove them if necessary.
Disconnect Wires
Now, observe the wires attached to the switch. There are usually three. Loosen the screws holding the wires. Do this carefully. Remove each wire one by one. Keep track of their positions. This helps during reinstallation.
Installing The New Switch
Installing a new light switch might seem daunting at first. Rest assured, it’s simpler than it appears. With a few tools and basic knowledge, anyone can do it. Start by gathering your materials. You’ll need a screwdriver, wire strippers, and a voltage tester. Ensure your new switch matches the type you’re replacing. Safety is key, so turn off the power at the circuit breaker.
Connect Wires
Begin by stripping the ends of the wires. Use wire strippers for a clean cut. Connect the black wire to the brass terminal on the switch. This wire is known as the hot wire. Next, attach the white wire to the silver terminal. This is the neutral wire. Ensure each connection is tight. Loose wires can lead to faults.
Secure The Switch
Once the wires are connected, place the switch in the wall box. Align it with the screw holes in the box. Use a screwdriver to tighten the screws. Make sure the switch sits flush against the wall. A secure fit prevents movement. Finally, attach the switch cover plate. It protects the internal wiring. Check that the plate is aligned correctly.
Testing The Installation
Ensure the light switch works correctly by testing the installation. Turn the power back on and flip the switch. If the light turns on, the wiring is successful. If not, double-check connections and ensure wires are secure. Safety first.
Testing the installation of your light switch is crucial. You’ve worked hard to connect everything, and now it’s time to ensure your efforts were successful. This process not only confirms that your switch functions properly, but also that it’s safe. Imagine the satisfaction when you flip the switch and your lights illuminate just as planned. Let’s walk through the essential steps to make sure everything is perfect.Check Connections
Start by inspecting the connections. Ensure each wire is firmly secured to its designated terminal. Loose wires can cause flickering or even a complete lack of power. Feel the wires gently to make sure they’re snug. If a wire seems loose, tighten it using your screwdriver. Verify that no wire insulation is pinched or exposed. This can lead to short circuits or electrical hazards. A simple oversight here can lead to frustrating troubleshooting later.Restore Power
Before restoring power, double-check that the switch is in the ‘off’ position. This prevents any unexpected sparks or shocks. Head over to your circuit breaker or fuse box and flip the corresponding switch back to the ‘on’ position. Return to your light switch and test it. Flip it on and off a few times to ensure consistent operation. If the light doesn’t respond, reassess your wiring connections. Does your light work as expected? If yes, you’ve successfully completed the task. If not, don’t worry, retrace your steps and look for any missed details. Testing isn’t just about function; it’s about peace of mind. Knowing your installation is secure means fewer surprises in the future. Have you ever completed a task only to find out something was amiss? Checking thoroughly can save you from such experiences.Troubleshooting Common Issues
Wiring a light switch is a straightforward task. Sometimes things don’t work as planned. Knowing how to troubleshoot common issues can save time and frustration. Let’s explore some frequent problems and their solutions.
No Power
No power at the switch can be frustrating. First, check the circuit breaker. It may be tripped or turned off. Reset it and test the switch again. If that doesn’t work, inspect the wiring connections. Loose wires can interrupt the power flow. Tighten any loose connections carefully. Still no power? Consider testing the voltage with a multimeter. It helps identify wiring or switch faults.
Flickering Lights
Flickering lights can be distracting. This issue often stems from loose connections. Ensure all wires are securely attached. Sometimes flickering happens due to a faulty bulb. Replace the bulb to see if it solves the problem. Another reason might be voltage fluctuations. Check the circuit for stability. If the flickering persists, the switch itself might be defective. Replacing the switch can resolve the issue.
Maintenance Tips
Learning how to wire a light switch requires careful preparation. First, ensure power is off for safety. Follow step-by-step instructions, connecting wires correctly to avoid issues. Regularly check connections to maintain functionality and prevent hazards.
When it comes to wiring a light switch, proper maintenance is key to ensuring its longevity and functionality. Neglecting routine care can lead to electrical issues or even safety hazards. Let’s dive into some simple yet effective maintenance tips that will keep your light switches in excellent condition. ###Regular Checks
Conducting regular checks on your light switches is crucial. Make it a habit to inspect them every few months. Look for signs of wear, such as discoloration or cracking on the switch cover. Listening for any buzzing sounds when you flip the switch can also help detect underlying electrical problems. Do you notice any sparks? It might be time for a closer look. ###Replacing Faulty Parts
Replacing faulty parts is essential to prevent further damage. If a switch feels loose or doesn’t operate smoothly, it might need replacement. Swapping out a malfunctioning switch is a straightforward task. Gather the necessary tools, such as a screwdriver and a new switch. Follow the wiring instructions carefully to avoid mishaps. Remember, safety first—always turn off the power before you start. Maintaining your light switches doesn’t require a professional touch. With regular checks and timely replacements, you can ensure your switches work flawlessly. Have you ever thought about how small actions can make a big difference in home safety? It’s worth considering.Frequently Asked Questions
What Wires Go Where On A Light Switch?
Connect the black (hot) wire to the switch’s brass terminal. Attach the white (neutral) wire to the silver terminal if needed. Secure the green (ground) wire to the green terminal or grounding screw. Always turn off power at the breaker before wiring.
Is There A Wrong Way To Wire A Light Switch?
Yes, incorrect wiring can occur. Incorrect connections may cause malfunctions or hazards. Always follow electrical guidelines and ensure proper connections. Hiring a licensed electrician ensures safety and compliance with regulations. Proper installation prevents short circuits and ensures functionality. Safety is paramount when dealing with electrical components.
How Do You Wire A Simple Light Switch?
Turn off the power at the circuit breaker. Connect the black wire to the brass terminal. Attach the white wire to the silver terminal. Ground the green or bare wire to the green screw. Secure the switch in the electrical box.
Restore power and test the switch.
Does The Hot Wire Go On Top Or Bottom Of A Light Switch?
The hot wire typically connects to the bottom terminal of a light switch. Ensure safety by turning off power before installation. Properly secure connections to avoid electrical issues. Always consult electrical guidelines or a professional for accurate wiring.
Conclusion
Wiring a light switch can be simple with the right guide. Follow safety tips to ensure your safety. Make sure to turn off the power before starting. Gather your tools and follow each step carefully. Double-check connections to avoid issues later.
Practice patience and stay focused throughout the process. With these tips, your light switch will work smoothly. Remember, safety first for any electrical task. Enjoy your new skill and the light it brings.


