3-way switch wiring can seem complex at first glance. It’s a crucial skill for any DIY enthusiast.
Mastering this can greatly enhance your home lighting control. Imagine controlling a single light from two different locations. This is where 3-way switch wiring becomes essential. Whether you’re navigating a hallway or entering a room, this wiring setup offers convenience and efficiency.
Many homeowners find it intimidating, but with the right guidance, it’s manageable. Understanding the basics helps prevent common electrical errors and ensures safety. In this blog, we’ll simplify the process for you. Our goal is to make it accessible, even if you’re new to electrical work. Let’s demystify 3-way switch wiring together. With clear steps and explanations, you’ll gain confidence in tackling this project.
Introduction To 3-way Switches
3-way switches are common in home lighting systems. They allow control of a single light from two locations. This setup is practical in long hallways, staircases, and large rooms. Understanding 3-way switches can improve your lighting experience. It offers convenience and flexibility in managing lights.
Purpose Of 3-way Switches
The main purpose of 3-way switches is to enhance control. You can turn a light on or off from two different spots. This feature is helpful in various settings. Imagine controlling a hallway light from both ends. Or managing a staircase light from both floors. It makes everyday tasks easier.
Benefits In Home Lighting
3-way switches offer multiple benefits for home lighting. They provide flexibility in light control. You save energy by not leaving lights on. They increase convenience in large or multi-level homes. With 3-way switches, lighting becomes more user-friendly. It’s a simple way to improve home efficiency.
Components Of A 3-way Switch System
Understanding the components of a 3-way switch system is essential. It helps in wiring the system correctly. A 3-way switch system allows you to control lights from two locations. It’s practical for staircases and long hallways. Knowing the components can save time and effort. It also ensures safety in installation.
Switch Types And Variations
There are several types of 3-way switches available. The most common are toggle switches. These are easy to find and use. Paddle switches offer a sleek look. They fit modern decor better. Some switches have dimmer options. These allow for adjusting light brightness. Choose a switch that fits your needs and style.
Required Tools And Materials
Gather the necessary tools and materials before starting. You’ll need a screwdriver and wire stripper. A voltage tester is also important. It ensures safety during installation. Get electrical tape for securing wires. You’ll need wire connectors too. They help in making secure wire connections. Ensure you have enough wire for the job.
Basic Wiring Principles
Understanding the basic wiring principles of a 3-way switch is essential. It allows you to control lights from two different locations. Whether you’re installing new lights or upgrading old ones, grasping these principles helps. It ensures your electrical system works effectively and safely.
Electricity Flow In Circuits
Electricity flows through circuits in a continuous loop. A 3-way switch alters the path of this flow. It redirects electricity to turn lights on or off from multiple locations. The flow begins at the power source and travels through wires. Switches interrupt or redirect this flow to control light operations.
Safety Precautions
Safety is crucial when working with electrical wiring. Always turn off the power before starting any wiring task. Use insulated tools to prevent electrical shocks. Double-check connections to ensure they are secure. Wear safety gloves and goggles to protect yourself.
Follow local electrical codes for safe installations. Improper wiring can lead to hazards. Regularly inspect wiring for signs of damage or wear. Ensure all components are compatible. This helps maintain a safe electrical system.

Step-by-step Wiring Guide
Discover the basics of 3-way switch wiring in this easy-to-follow guide. Learn how to connect switches for better lighting control. Perfect for beginners looking to enhance their electrical skills.
If you’re tackling a home improvement project involving electricity, wiring a 3-way switch can be a useful skill. It might seem intimidating at first, but with a clear plan and a steady hand, you can do it. This step-by-step wiring guide will help you navigate the process with confidence.Preparation And Planning
Before you dive into the wiring, take a moment to plan. Identify the switches you want to replace or install. Make sure you have all the necessary tools and materials, like wire strippers, a screwdriver, and the right type of switches. Safety is paramount. Turn off the power at the circuit breaker to avoid any accidents. Double-check with a voltage tester to ensure no electricity is flowing. Label the wires in your existing setup. This will prevent confusion later. It’s a simple step that can save you a lot of headache.Installing The First Switch
Start with the first switch. Remove the old switch if there is one. Note where each wire is connected, and take a photo if necessary. Connect the wires to the new switch. Typically, you’ll have a common wire, usually black, and two traveler wires. Make sure each is secured tightly to the corresponding terminal. Install the switch into the electrical box. Tighten the screws and ensure the switch is aligned properly. Before moving on, think about how the switch will be used. Is it at the right height? Is it easily accessible? Small adjustments now can make a big difference in usability. By following these steps, you’re not just completing a task—you’re enhancing your home. What other electrical projects could you tackle with this newfound confidence?Connecting The Second Switch
Connecting the second switch in a 3-way wiring setup is crucial. This step ensures the lights function properly from two different locations. You must understand the wiring to avoid errors. This guide will help you connect the second switch with ease.
Wiring The Traveler Wires
First, identify the traveler wires in your setup. Usually, two wires connect the first and second switch. These wires carry signals between switches. Connect one traveler wire to the left terminal of the second switch. Then, attach the second traveler wire to the right terminal. Ensure both connections are secure and tight.
Securing Connections
Properly secure all connections to prevent electrical faults. Use a screwdriver to tighten each terminal screw. Loose connections may cause flickering lights or power loss. Check each wire is firmly attached to its terminal. Inspect the switch box for any exposed wires. Cover them with electrical tape to prevent short circuits.
Testing And Troubleshooting
Identifying issues in 3-way switch wiring requires careful examination of connections and wire colors. Ensuring each terminal is correctly linked can resolve common problems like flickering or non-functional switches. Testing with a voltage meter aids in diagnosing miswiring and achieving seamless operation.
Testing and troubleshooting 3-way switch wiring is a critical step to ensure that your lighting setup works seamlessly. Imagine flipping a switch and watching your lights flicker or not turn on at all—frustrating, right? To avoid such hassles, you need to make sure everything is connected properly and functioning as it should. This process doesn’t just save you time but also prevents potential electrical hazards in your home.Ensuring Proper Functionality
First, test your setup by turning the switches on and off in different combinations. Check if the light turns on and off from all switch locations. If everything works as intended, you’re on the right track. Use a voltage tester to confirm that power is reaching the switches. This device is simple to use and can quickly point out any disconnects in the circuit. If you find any issues during testing, double-check your wiring connections. Sometimes a loose wire or incorrect connection can cause problems.Common Issues And Solutions
One common issue is the light not turning on from one switch. This might be due to a miswired traveler wire. Ensure that the traveler wires are connected to the correct terminals on all switches. Another problem could be both switches failing to control the light. In this case, check the power source connections. Make sure the power supply is connected to the common terminal of the first switch. If one switch works but the other doesn’t, the issue might be a faulty switch. Swap it out with a new one to see if that resolves the problem. Troubleshooting isn’t just about fixing issues; it’s about understanding what could go wrong. Have you ever thought about what might happen if you ignore a minor wiring issue? A small oversight can lead to bigger problems down the line. Testing and troubleshooting might seem tedious, but it’s crucial for a safe and functional electrical setup. By taking the time to ensure everything is working correctly, you’re making your home a safer place. So, have you checked your 3-way switch wiring today?Advanced Configurations
Discover the simplicity of 3-way switch wiring for advanced configurations. Easily control lights from two locations. Perfect for hallways and staircases.
When it comes to wiring a 3-way switch, the basic setup is just the beginning. Advanced configurations allow you to add new features and functionality to your lighting system, making your home more convenient and efficient. These configurations can include adding dimmer switches for adjustable lighting, or integrating your switches with smart home technology for remote control and automation.Adding Dimmer Switches
Adding a dimmer switch to your 3-way wiring setup can transform how you use lighting in your home. Imagine adjusting the brightness for the perfect movie night ambiance. To include a dimmer switch, you’ll need a compatible dimmer designed for 3-way circuits. Replace one of the standard switches with the dimmer. Ensure that the dimmer switch is installed on the load side of the circuit for optimal performance. Be mindful of the type of bulbs you use. Not all dimmers work with every type of bulb. Check compatibility to avoid flickering issues.Integrating Smart Home Technology
Want to control your lights from your smartphone? Integrating smart home technology with your 3-way switch wiring can make that possible. Smart switches are available that replace traditional 3-way switches. These smart devices connect to your home’s Wi-Fi, allowing you to manage your lights through an app or voice commands. Consider your existing smart home ecosystem. Is it compatible with Alexa, Google Home, or Apple HomeKit? Choosing the right smart switch ensures seamless integration with your devices. Installing smart switches might seem daunting at first. But remember, each step brings you closer to a more connected and efficient home. Have you ever considered how much time you could save with automated lighting schedules? Embrace these advanced configurations and elevate your living space beyond the ordinary. Your perfect lighting setup is just a few steps away.Maintenance And Upgrades
Maintaining and upgrading your 3-way switch wiring is crucial. It ensures a reliable and efficient lighting setup. Regular checks help prevent issues before they become major problems. Upgrades can enhance functionality and improve energy efficiency.
Regular Checks And Repairs
Perform regular checks on your switches. Look for signs of wear and tear. Check for loose connections and frayed wires. These can cause flickering lights or complete failure. Repair any damage immediately. It prevents further complications and ensures safety.
Inspect the switches and wiring often. Dust and debris can accumulate. They may affect the performance of your switches. Clean the switches carefully. Use a dry cloth to remove dust. This simple step keeps your system running smoothly.
Future-proofing Your Setup
Consider future-proofing your 3-way switch system. Technology is evolving rapidly. New features can make your lighting setup smarter. Upgrade to smart switches. They offer remote control and automation features. This adds convenience and efficiency to your home.
Use energy-efficient bulbs with your switches. They reduce energy consumption and lower bills. Choose bulbs compatible with your current setup. This ensures seamless integration and long-term savings. Planning ahead keeps your system up-to-date and reliable.
Frequently Asked Questions
Which Wire Goes Where On A 3-way Switch?
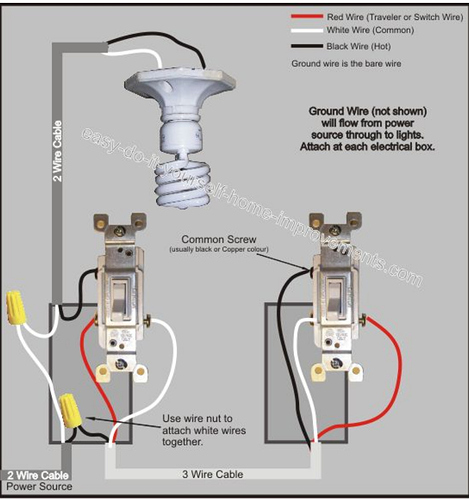
Connect the common wire to the black screw. Attach traveler wires to the brass screws. Ensure ground wire connects to the green screw. Verify proper connections by referring to the switch diagram or instructions. Always prioritize safety and consult a professional if unsure.
What Happens If You Wire A 3-way Switch Wrong?
Wiring a 3-way switch incorrectly can cause lights not to work or flicker. It may also lead to circuit shorts or electrical hazards. Ensure proper wiring to avoid these issues and consult a professional if unsure. Proper installation ensures safe and efficient operation.
Which Wire Is Always Hot On A 3-way Switch?
The “common” wire on a 3-way switch is always hot. It’s typically black and carries the electrical current.
Does It Matter Where The Traveler Wires Go On A 3-way Switch?
Yes, traveler wire placement is crucial for proper 3-way switch function. They connect two switches, allowing light control from multiple locations. Incorrect wiring can lead to malfunction or safety hazards. Ensure traveler wires are connected to the corresponding terminals on both switches for optimal performance.
Conclusion
Mastering 3-way switch wiring enhances home safety and convenience. It allows control of lights from multiple locations, adding flexibility. Always ensure safety first. Turn off power before starting any wiring project. Use quality materials and follow guidelines carefully. Mistakes can lead to malfunctions or hazards.
Consult a professional if unsure. This guide simplifies the process, making it easier to understand. Practice makes perfect. With patience, anyone can grasp this skill. Improve your home lighting setup today. Keep learning and exploring new skills to enhance your home environment.
Stay safe and informed.


